How to Use the PTT Support Ticket System

*must be a designated PTT Help Desk User |
This guide outlines the basic steps for requesting help from Precision Support via our ticketing system, PTT Help Desk (powered by Workfront). Please reference this guide with questions about how to request help, monitor and track updates of requests, and track closed requests.
This request process should be used for all types of inquiries, project requests or system issues that you may have. The system has been setup and designed around an efficient response process to ensure you get the help you need as quickly as possible.
Registering Users for the Help System
The PTT Professional Services Methodology recommends that clients create an internal Client Core Team for supporting and maintaining the TBS product. At least two members of this core team will be provided user accounts to access the PTT Help Desk. These will be separate credentials than those used in TBS.
All other TBS users at the client’s site should report issues to the Client Core Team, who can then report them to PTT Customer Support via the Help Desk system as needed. This approach will quickly build a central base of knowledge within your organization that, over time, will empower your team and minimize your reliance on PTT Support and Consulting Services.
You should work with your Client Account Manager for identifying and registering your help desk users if not already setup.
Once provided with credentials to access the PTT Help Desk system, users can access the help desk at https://precision.attask-ondemand.com or via the Submit A Ticket button above.
Important: The login/email address IS case sensitive. Please be sure to match the email login ID to that provided from Precision.
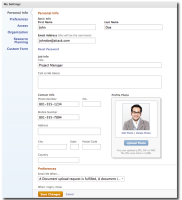
Each user in the help desk will have a personalized profile. You can access your profile settings by clicking on the user avatar icon link at the top right section of the page and selecting "My Settings". There are multiple sections to the settings page that allow you to change your information.
Personal Info
This section contains personal information about the user, such as name, email, phone number, etc. You can also change your password by clicking the link in this section. Fee free to fill out as much or as little information as you would like in this section including uploading a photo/logo to distinguish your user.
Preferences
In this section you can modify your notification settings using the "Email Me When" dropdown. This gives you control over notifications that you receive about new requests or updates to your existing requests. These notifications are sent as an email. Here you can also choose things such as your timezone and locale.
**The other areas are not to be edited by you and you will not have access to view other groups, companies, etc.**
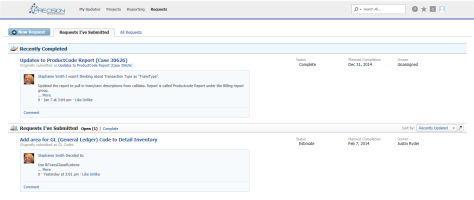
Upon login, users will presented with a screen similar to this:
If you have current open requests that you have submitted, they will also be shown on this home screen as well showing Recently Completed requests first. Users can toggle between Open and Completed Requests using the sub tabs/links. This tab will only show those requests initiated by the logged in user.
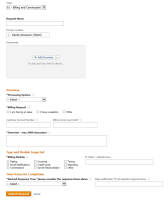
To submit a new request, click on the blue "New Request" button on the top left corner of the page. Be sure to select the Request type that matches your company name. It will be your Company's Name + "Requests". Ex: "ABC Telecom Requests".
Once the "Company" Requests option has been selected, a description of the request topics will appear along with the standard support response times for each type.
Please be sure to try and select the proper option from the "Topic" drop down in order to have access to the appropriate fields necessary for your request. Fields that have a bold label on this page are required fields.
Once you have filled out the entire form, click Submit. You will then be taken back to the Help Desk home screen and your new request will appear in the list. Depending on your notification settings, an email may have been sent to you with the request details. By default, this is turned off since you are already logged into the system and can verify your submission. Your request will automatically be assigned to the client support team associated with your company.
Documents or screenshots can be added to the request by dragging and dropping files to the document section, linking to Google Drive, searching for a file stored locally, or pasting as an image from the clipboard (pasting only works in Chrome or Firefox).
The Requests I've Submitted page is a list of all of your requests. If you do not have any open requests, you will not see any on this page by default. If you do have open requests, it will look similar to this:
You can view closed requests by clicking on the Complete sub tab link and toggle back to the open requests by clicking on Open. When there are open requests the number of requests in your list will be represented next to the Open link in parentheses. You can also sort your list of requests by changing the "Sort By" drop down on the top right hand side of the screen of the "Requests I've Submitted" section. By default they are sorted by the most recently updated.
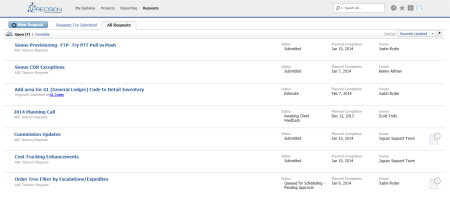
All Company Requests: You can view all requests that have been submitted by all users in your company by clicking the All Requests tab at the top of the page next to the Requests I've Submitted tab. This will provide a list of all Issues, Tasks and Projects for your company that have been initiated via the request queue. Similar functionality exists with the Open | Complete toggle links.
As requests are worked by the PTT support team, they may enter a variety of statuses as you can see in the previous screen shot. These statuses are meant to keep you informed of where your request is in the work flow.
For general questions and requests (non-development), here is a list of all of the statuses that an issue can have and their descriptions:
- Submitted: The request has been opened and received in the PTT Help Desk. It has been assigned to a Customer Support Team, however it has not yet been reviewed or worked.
- Initial Review: Once someone from the Customer Support Team is available to work the request, they will change the status to Initial Review while they identify the request type and what effort needs performed.
- Pending Dev Review: If a request requires development input, the Customer Support representative will invoke the help of this team and change the status to indicate this as well. This allows the client to see that additional input is needed.
- Awaiting Client Feedback: The request is awaiting feedback from the end user. This could be a result of more information added by the Customer Support Representative or a request for more information. It's also possible that a potential fix was proposed to the end user.
- In Progress: The request has been assigned to a Customer Support Representative and they are working to complete the request.
- On Hold: The request is unable to be worked at this time, but it is agreed that it will be worked in the near future. This could be due to the client or to PTT.
- Resolved: Used for general issues and tasks. The request was either resolved without requiring a code change or a suitable work-around was found and made available.
For Issues/Tasks that have turned into Development Projects the additional work-flow statuses may be used. Please be sure to review the Projects section for how development efforts will be tracked:
- Requested - Pending Approval: The request will require development and must be reviewed by the Steering Committee to determine if / when the request can be completed. If the request does not fall in line with the development roadmap, it is possible the request will not be carried through to development.
- Idea or Planning: This status signifies the beginning of the planning phases for requests requiring development and that have been approved by the Steering Committee. The request will be reviewed in more detail by development, Estimated, Quoted (possibly) and then Scheduled.
- Estimate: The request is being estimated and broken down by the developers.
- Ready to Quote: The request has been estimated, broken down and is ready to be quoted to the client for approval.
- Ready to Schedule - Pending Approval: The request has been estimated and a quote sent to the client for approval. No work however can be done on the task until it has been approved by the Client sponsor and then it can be planned into an iteration.
- Ready to Schedule: Signifies the client has approved the estimate and effort and the request is ready to be scheduled from the backlog based on other project priorities.
- Ready to Test: Used for development tasks only and signifies that a request is ready for developer testing.
- Ready to Merge: Used for development tasks only and signifies that the request has passed developer testing and is ready to merge to a demo system for possible client review.
- Complete: Used for development tasks only and signifies that the requested development is completed. Note: Despite being completed, the requested development may still be pending a code release to place this into production for the client.
A quick update to a request can be added directly from the Requests I've Submitted page. Simply click on the "Comment" link next to a certain request and you will be prompted for the comment. These comments will be delivered to the Customer Support department.
It is important to note that all requests are considered "Issues" when initially submitted. A request may then be turned into a "Task", meaning that work other than just answering a question is necessary. Additionally, an Issue could be turned into a Project if development or greater effort and breakdown is required.
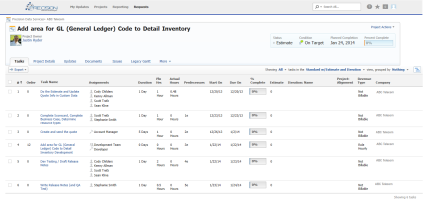
If an issue has been turned into a project, clicking on the request/project title will take you to a breakdown of the items necessary to complete the original request. The original issue can still be viewed from the Requests tabs, but is meant only as informational. Please be sure to make any updates to the Project using the Updates tab once inside the Project. See example below:
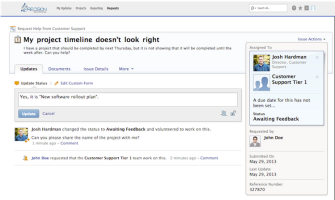
If a request has remained an issue or been converted to a Task, when clicking the request title, you will see a page that has two main sections. A quick details panel and the main details section. Updates can be entered here as well and comments can be made on previous updates.
The right hand section of this page shows the Quick Details panel and contains details about the current request such as the Assigned User, Status, Request ID, etc. This will also show the estimated date the request will be due on. This due date is based on the original response time for the request as mentioned above and is subject to change depending on the workload of the customer support team.
The Updates tab shows all of the comments made on this request. Comments are threaded for ease of tracking replies to certain comments. This list will contain all comments from both end users and PTT employees. Users can add a new update in the form provided or reply to an existing comment by clicking on the "Comment" link. This will be the primary means of communication when working a request vs. traditional email. Based on your user settings, an email / notification will be triggered each time an update or comment is created.
Include other Users on Updates
When making updates, it is possible to include other Help Desk users on the notification. This could be other users in your company or PTT users not already working on the request. Just click the "include others" icon when making a status update or a comment. Begin typing and any registered Help Desk users will appear.

Documents tab
This tab will contain any documents submitted with the original request and also allows users to add new documents to a request. Descriptions and comments can be added to each document by clicking the appropriate link. This will also be where any reports or request outputs will be stored. Google documents or compressed files will be primarily used.
![]() Important: All documents must be attached to requests from within the system vs. email. This ensures that all document keep the same version for all users.
Important: All documents must be attached to requests from within the system vs. email. This ensures that all document keep the same version for all users.
Issue Details or Task Details
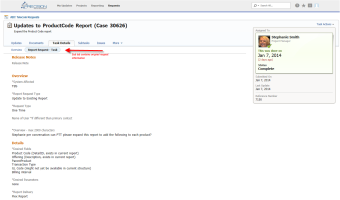
This tab will show the details of the request along with a sub tab link that will show the details of the original submission.
Issues Sub tab
For Projects and Tasks, they could possibly have additional issues added to their item. This would usually occur when something unplanned occurs and needs action before the Task or Project can be completed.
The My Updates menu will provide quick access to all updates that have occurred on any request you have been involved in. This is also where any Approvals will be requested (i.e., for development quotes, etc.).
In addition to email notifications (if turned on via My Settings), updates will trigger a status notification indicator in the top right corner of the menu bar. This is useful if you are not on the My Updates tab.
The PTT Help Desk system has the ability to request approvals from clients at certain points within a request life cycle. A common approval process will be for paid custom development work. Clients will be sent an email notification when a task or project is ready for their approval. Each client will have a project sponsor who will be responsible for approving these types of requests.
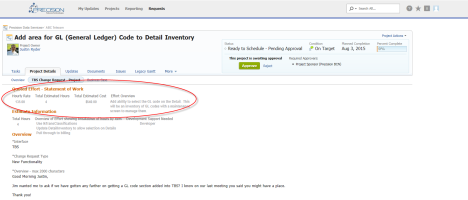
When approval is requested, an email will be sent to the project sponsor that has been designated to approve effort. Next steps should be to follow the link in the email and log into the PTT Help Desk System. Review the Project or Task by clicking on the Project or Task Details tab. Click the Custom Forms sub tab to view the original request, the Estimate Information from the development team and the Quote Effort - Statement of Work.
If all is well with the Project / Task, select the Approve button in the top right corner so the project/task can continue its work flow through the request process. The Project Owner (typically the Account Manager) will be notified.
The Reject link can be used if the effort for the project / task are not approved or if the Statement of Work does not reflect the original request.
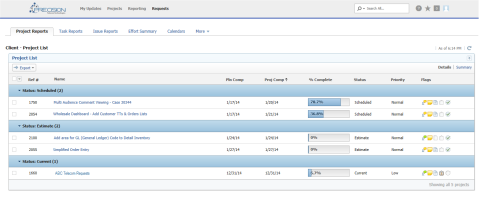
The Reporting Dashboard provides access to a variety of reports by Project, by Task and by Issue as well as providing Effort Summary reports and access to client and project Calendars.
Every request that is submitted to the PTT Help System is automatically tied to a client project. This ensures that all requests are grouped properly and can be expanded out to greater detail or more independent projects if needed.
General help and support Issues and Tasks (Daily Operation support) that do not require development will be associated with a main Client Requests project. Example: Project name="ABC Telecom Requests". This project is also the placeholder for all Recurring tasks such as scheduled bill runs, Commission Processing and scheduled team calls.
Requests that come in that require development or greater breakdown of effort will be migrated to their own Project vs. living inside the main ABC Telecom Requests project. These can then be tracked separately and not be confused with daily operations items.
In an effort to make tracking and initiating recurring tasks easier, we have setup a "Recurring Items" calendar under the Reporting menu that will show all scheduled bill runs, commission processing dates, carrier reconciliation processing dates and schedule team calls.
Users can see all the items that recur each month as they navigate through the calendar year within this calendar.
Initialize Bill Runs or other Recurring Items: For clients that provide a "green light" prior to a process being kicked off by Precision, they can now find the associated recurring task in the calendar, click on the item and then click into the task using the Task title link. Updates can then be made to task to let Precision Support know the processing can begin, ask questions about the processing item or even upload CDRs or other required data necessary for that processing task.
We hope that the use of the PTT Help Desk improves your ability to use TBS and get issues resolved in a timely manner. Users who call requests into the Customer Support department over the phone also have their requests show up in that users Help Desk account and can be tracked and updated online. When calling Customer Support about a request that has already been entered online, please refer to the Reference Number that is accessible on the Quick Details Panel.
*must be a designated PTT Help Desk User
