2020-03 Tony
General
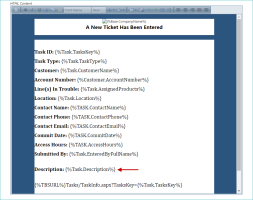
In previous releases, the formatting of text created using replacement parameters would sometimes not appear correctly when added to an email via a template. This issue was specifically noticed with descriptions on tasks. Now, this text displays properly in sent emails that contain replacement parameters, matching the text and formatting that appears in the actual task descriptions.
An example of this task description replacement parameter being used in an email template is shown below.
LOCATION: Setup / Notifications / Email / Templates / individual template details
Commissions
The Agent Transactions/Adjustments tab now includes a Customer column that displays the customer's name and account number. This number is now also included in the corresponding Adjustments report.
LOCATION: Channel Support / Commissions Control Panel / Pre-Commissions tab
NOTE: This field is mostly informational and will not impact how the adjustment is applied.
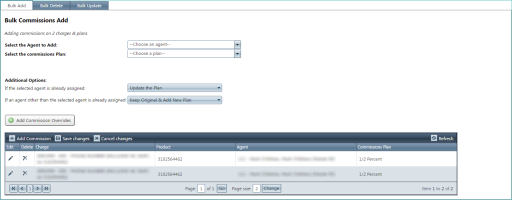
You can now add, delete, and update multiple product and charge commissions at the same time using the bulk screen for commissions. This bulk screen (shown below) allows you to edit agent and commission plan options for all the selected items.
Accessing the New Bulk Commission Options
You can access the new bulk commission options from various locations in TBS based on your current task:
When working with multiple products, use the Edit Commissions button to access the Commissions tab on the bulk screen.
LOCATION: Customers / individual customer details / Products tab / All Products subtab
LOCATION: Customers / individual customer details / Products tab / individual product-type subtab
After selecting more than one product, click the Edit Commissions button.
The bulk screen appears with the Commissions tab selected. For more information, see Adding Commissions in Bulk.
When working with a specific customer's products, the bulk options appear as buttons on the Product Commissions subtab.
LOCATION: Customers / individual customer details / Products tab / Product Commissions subtab
These bulk buttons appear at the top of the subtab.
NOTE: The Bulk Add button is always accessible. However, the Bulk Delete and Bulk Update buttons can only be used when bulk entries already exist. Otherwise, these two buttons are grayed-out.
The bulk screen appears with the Commissions tab selected. For more information, see Adding Commissions in Bulk.
When working with multiple entries on the a customer's Charges & Plans subtab, use the Edit Commissions button to access the Commissions tab on the bulk screen.
LOCATION: Customers / individual customer details / Products tab / Charges & Plans subtab
After selecting more than one entry from the list, click the Edit Commissions button. When this option is used, there are no overrides at the charge level. Instead, the commissions are applied at the product level, allowing you to give specific charges different commission rates.
The bulk screen appears with the Commissions tab selected. For more information, see Adding Commissions in Bulk.
Adding Commissions in Bulk
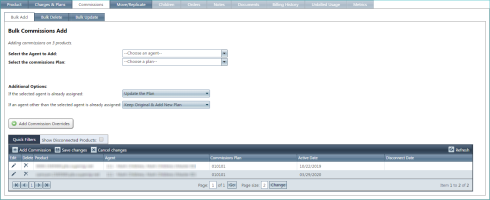
After selecting multiple items and accessing the bulk screen (as described in Accessing the New Bulk Commission Options above), the Bulk Commission screen appears with the Bulk Add subtab selected, allowing you to set options for the product or charges you selected.
The available bulk options are displayed in the top half of the subtab. The items you selected appear in a grid at the bottom of the subtab.
NOTE: Only selected items that already have set commissions are shown in the grid. For example, if you selected five items, but three of those items have commissions associated with them, then only those three items would appear in the grid immediately. If there are no existing commissions set on the selected item, then the grid will be empty.
Specify any of the following bulk options for the selected items:
- Select the Agent to Add. Specify an agent for the new commissions (if more than one is available).
-
Select the commissions Plan. Specify the appropriate commissions plan.
NOTE: This setting will override anything tied to the current customer or already set at the agent level.
- If the select agent is already assigned. Specify what should happen if the selected agent is already assigned to any of the items being bulk added. You can update the plan to match the one selected above or keep the plan already assigned to the agent (original plan).
-
If an agent other than the selected agent is already assigned. Specify what should happen if a different agent is already assigned to any of the items being bulk added. The following options are available:
- Keep Original & Add New Plan. Allows you to keep the original agent, but assign the new plan selected above.
- Replace Original. Allows you to replace the current (original) agent with the new agent selected above.
- Keep Original & Do Not Add New Plan. Allows you to keep the original agent and the original plan (make no changes).
NOTE: The Keep Original & Add New Plan and Replace Original options are identical in cases where no existing commissions are present.
Once you have specified all necessary options for the bulk addition, click the Add Commission Overrides button.
Updated items appear in the grid at the bottom of the screen. This grid shows products, their associated agents and commission plans, and the product's original active date and (if applicable) disconnect date.
Each of these entries can also be edited (inline) or deleted individually, as described in Editing Individual Items on the Bulk Commissions Screen below.
NOTE: If the Bulk Delete and Bulk Update tabs were originally not accessible (grayed-out), once you complete the process of bulk adding commissions for the first time, these tabs become available if you re-access the Bulk Commissions screen.
Deleting Commissions in Bulk
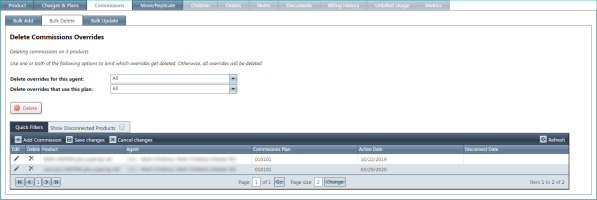
After selecting multiple items and accessing the Bulk Commissions screen (as described in Accessing the New Bulk Commission Options above), use the Bulk Delete subtab on the Bulk Commission screen to specify the available bulk delete options and complete the deletion process.
NOTE: The Bulk Delete subtab can only be used when bulk entries already exist (have been added) and commissions are available. Otherwise, it is grayed-out and inaccessible.
Specify any of the following bulk options for the selected items:
- Delete overrides for this agent.
- Delete overrides that use this plan.
Once you have specified all necessary options for the bulk deletion, click the Delete button, and click OK to confirm the action.
Updating Commissions in Bulk
After selecting multiple items and accessing the Bulk Commissions screen (as described in Accessing the New Bulk Commission Options above), use the Bulk Update subtab on the Bulk Commission screen to specify the available bulk update options and complete the updating process.
NOTE: The Bulk Update subtab can only be used when bulk entries already exist (have been added) and commissions are available. Otherwise, it is grayed-out.
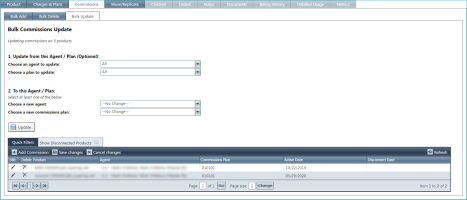
Several options are available when bulk updating commissions. These options allows you to specify the current agent or plan and then a new agent or plan, based on your needs.
-
Specify any of the following Update bulk options for the selected items, as desired:
- Choose an agent to update. If you want to update the agent for the selected commissions, select the current (original) agent.
- Choose a plan to update. If you want to update the plan for the selected commissions, select the current (original) plan.
-
Specify at least one of the following To bulk options for the selected items, as desired:
- Choose a new agent. If you're updating the agent for the selected commissions, select the new, replacement agent.
- Choose a new commissions plan. If you're updating the plan for the selected commissions, select the new, replacement plan.
Once you have specified all necessary options for the bulk update, click the Update button.
Editing Individual Items on the Bulk Commissions Screen
You can edit or delete individual items that appear at the bottom of the Bulk Commissions screen. For example, if you add 10 items but then decide that 1 was added by mistake, you can simply delete that single item instead of updating your original, bulk selection.
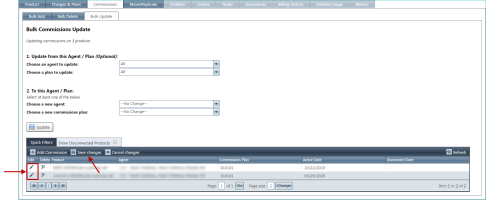
You can edit an item by clicking the icon in the Edit column, which allows you to edit (inline) all of the associated information with the exception for the dates. If you make these types of (inline) edits, be sure to click Save changes when you're changes are complete.
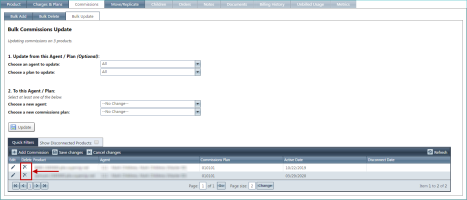
You can delete entries by clicking the icon in the Delete column.
Viewing Bulk Updates
You can see any bulk changes you make by examining the Product Commissions subtab (from the Products tab). This subtab shows commissions across all products for an entire account.
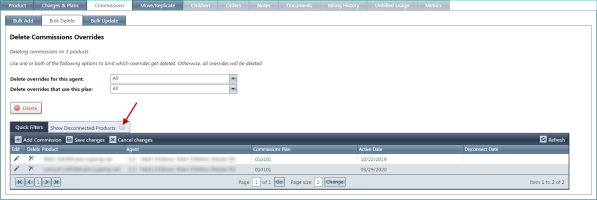
Additionally, you can choose to not display disconnected products using check box at top of grid, meaning only products with active commissions are shown within the grid.
Resolved Issues
-
General
The Accounts Receivable report was not properly showing agent directors if there was more than one agent on a customer. The agent directors now appear as expected in this scenario. (249095)
-
Integrated Products
- The Default Quantity text box was not applying to charges being added to a product from a package. When using this text box, it is now multiplied by the quantity of each charge in the package. These quantities can still be overridden in the grid, and the value set in the grid will be applied to the product when the Add button is clicked. (251801)
-
Previously, when copying a package, the charges and plans which were included in the package being copied would be copied to the new one, but the quantities would all be zero on the new packages. Now, the quantities will be copied from the old package to the new package. (252600)
-
Portals
- Previously, if a customer attempted to update any of their billing email information, an error would occur. The update can now be completed without error. (253457)
- Previously, wholesale users could not view their customer information when logged in to the customer portal. This information is now available, as expected. (254545)
-
Commissions
Previously, a Show Disconnected Products check box was appearing in the Commissions area for individual products. This check box no longer appears on individual products. (255084)
Release Database Changes
These are the differences that will be made to your existing database when upgrading to version 64.00.
NOTE: Also see BillHistoryV2 changes below.
The following fields have been dropped:
- T4CompanyMaster.QuickbooksConnectorUsername
- T4CompanyMaster.QuickbooksConnectorPassword
- T4CompanyMaster.QuickbooksConnectorURL
- T4CompanyMaster.QuickbooksCertFile
- T4CompanyMaster.QuickBooksConnectionTimeout
The following fields have been altered:
-
-- ActivityLogExpandedView.DetailID CharacterMaximumLength (30 -> 31)
-
-- ActivityQueueExpandedView.DetailID CharacterMaximumLength (30 -> 31)
-
-- CommissionsHeirarchyView.DetailID CharacterMaximumLength (30 -> 31)
-
-- DataIssuesView.DetailLkDetailID CharacterMaximumLength (30 -> 31)
-
-- DataIssuesView.DirectLkDetailID CharacterMaximumLength (30 -> 31)
-
-- DetailsLkDetailsView.DetailID CharacterMaximumLength (30 -> 31)
-
-- DetailsToAgentsView.DetailID CharacterMaximumLength (30 -> 31)
-
-- LkDetailsView.DetailID CharacterMaximumLength (30 -> 31)
-
-- LkDetailsView.SearchText CharacterMaximumLength (132 -> 133)
-
-- NetworkResourceEventsView.DetailID CharacterMaximumLength (30 -> 31)
-
-- QuickbooksInvoiceExportView.Quantity DataType (int -> decimal), NumericPrecision (10 -> 19), NumericScale (0 -> 2)
-
-- QuickbooksInvoiceExportView_Unprocessed.Quantity IsNullable (False -> True)
The following tables and views have been added:
- QuickBooksConnections
- QuickBooksLastProcessedTimes
The following fields have been added:
-
AgentsTransactions.CustomersKey
-
AgentsTransactionsView.CustomersKey
-
AgentsTransactionsView.AccountNumber
-
Company.QuickBooksConnectionsKey
-
CustomerInformation.AgentDirectorList
-
QBXML.CompanyKey
-
QuickBooksConnections.QuickBooksConnectionsKey
-
QuickBooksConnections.ConnectorUsername
-
QuickBooksConnections.ConnectorPassword
-
QuickBooksConnections.URL
-
QuickBooksConnections.CertificateFilename
-
QuickBooksConnections.Timeout
-
QuickBooksConnections.Description
-
QuickbooksInvoiceExportView.CompanyKey
-
QuickbooksInvoiceExportView_Unprocessed.CompanyKey
-
QuickbooksInvoiceExportView_Unprocessed.CustomersKey
-
QuickbooksInvoiceExportView_Unprocessed.InvoiceCustomer_QuickBooksRefId
-
QuickbooksInvoiceExportView_Unprocessed.QuickbooksInvoiceRefID
-
QuickBooksLastProcessedTimes.QuickBooksLastProcessedTimesKey
-
QuickBooksLastProcessedTimes.CompanyKey
-
QuickBooksLastProcessedTimes.LastExport
-
QuickBooksLastProcessedTimes.InvoicesLastSaveOrImport
-
QuickBooksLastProcessedTimes.ItemsLastSaveOrImport
-
QuickBooksLastProcessedTimes.CustomersLastSaveOrImport
-
QuickbooksPaymentExportView.CompanyKey
-
tmpCustomersFromQB.CompanyKey
-
TmpInvoicesFromQB.CompanyKey
-
TmpLkDetailsFromQB.CompanyKey
-
TmpLkDetailsFromQBView.CompanyKey
The following fields have been dropped:
- None
The following fields have been altered:
- None
The following tables and views have been added:
- None
The following fields have been added:
- None
