Move Product (to inventory or another account)
Every integrated product in the system has Move functionality. The Move function is available from:
--Actions tab of an existing customer's Product
--Actions tab of an unassigned product in Inventory
--Actions tab of an assigned product in Inventory
Products have the ability to be moved in / out of inventory or to another customer. Options are provided for setting the product location, how to handle existing Product charge and plan records, how to handle any child Products, and assigning or creating an Order associated with the Move. Depending on this selection, the screen will update to show necessary fields to perform this action.
Option 1: Move Existing Customer Product To Inventory
Option 2: Move Existing Customer Product To Another Customer (with or without Order)
Option 3: Move Unassigned Inventory Product To A Customer (with or without Order)
Option 4: Move Assigned Inventory Product To Another Customer (with or without Order)
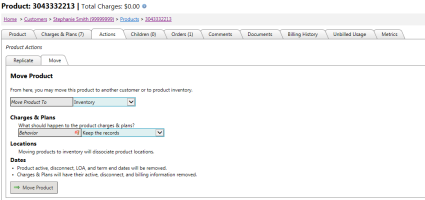
Option 1: Move Existing Customer Product To Inventory - this option will remove all Account associations as well clear any billing and term data on any Charges & Plans records tied to the product. It will also clear any ties to Locations. It will now be available in the Product Inventory to be assigned to another customer. After navigating to the product to be moved and selecting the Move tab from the Actions tab, follow the steps below.
Step 1: Select "Inventory" from the Move Product To drop down.
Step 2: Select the behavior for the Charges & Plans (if any) associated with the Product. Options include Keeping all records, Only Keep Records associated with a Carrier or Removing all records completely. If Charges & Plans are kept, the following field values will be cleared:
- Active Date
- Disconnect Date
- First Billing Date
- Last Billing Start Date
- Last Billing End Date
- Last Billing Amount
- LOA Dates
- Terms
- Term End Dates
Step 3: Click the Move Product button
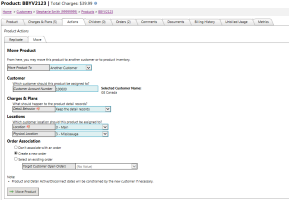
Option 2: Move Existing Customer Product To Another Customer - this option will allow an existing product to be moved to another customer. After navigating to the existing product and selecting the Move tab from the Actions tab, follow the steps below.
Step 1: Select "Another Customer" from the Move Product To drop down.
Step 2: Enter the Customer's Account Number - this will be verified and show the account's name
Step 3: Select the behavior for the Charges & Plans (if any) associated with the Product. Options include Keeping all records, Only Keep Records associated with a Carrier or Removing all records completely.
Step 4: Select the Target Customer's Location and Physical Location that the product should be tied to
Step 5: Determine if an Order should be associated with this move. Options include no association, creating a new Order or selecting an existing Order already setup on the Target Customer.
Step 6: Click the Move Product button
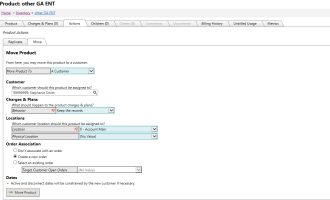
Option 3: Move Unassigned Inventory Product To A Customer - this option will allow an existing product to be moved to another customer. To get started, select the Inventory tool from the Utilities menu. Select the item from inventory by clicking the![]() View Details icon. Navigate to the Move tab from the Actions tab.
View Details icon. Navigate to the Move tab from the Actions tab.
Step 1: Select "A Customer" from the Move Product To drop down.
Step 2: Enter the Customer's Account Number or name to find the proper account
Step 3: Select the behavior for the Charges & Plans. Options include Keeping all records, Only Keep Records associated with a Carrier or Removing all records completely.
Step 4: Select the Target Customer's Location and Physical Location that the product should be tied to
Step 5: Determine if an Order should be associated with this move. Options include no association, creating a new Order or selecting an existing Order already setup on the Target Customer.
Step 6: Click the Move Product button
Option 4: Move Assigned Inventory Product To Another Customer - this option will allow an existing assigned product to be moved from one customer to another customer. To get started, select the Inventory tool from the Utilities menu. Select the item from inventory by clicking the![]() View Details icon. Steps for this option are the same as Option 2 above.
View Details icon. Steps for this option are the same as Option 2 above.


